|
The field of photo and video editing has grown significantly in recent years, with the rise of social media and the increasing demand for visually appealing content. One aspect that can make or break a photo or video is the background, especially when it comes to outdoor shots. A field with lush green grass can add depth and beauty to an image, but sometimes, the grass may not look as vibrant in real life as it does in our mind's eye. This is where the magic of Photoshop comes in - with a few simple techniques, you can add realistic-looking grass to your field photos and make them stand out. In this article, we will guide you through the process of adding grass in Photoshop, and give you some tips to make it look as natural as possible.
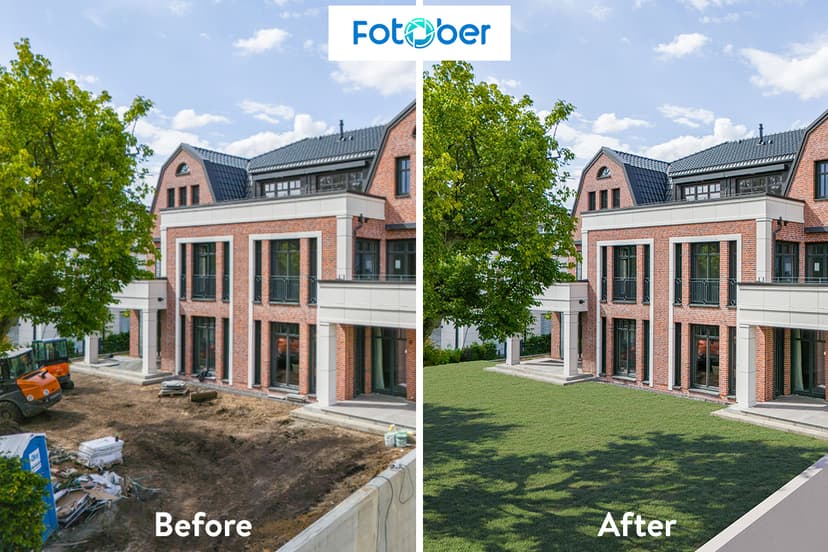
View Detailed Article At: how to add grass in photoshopStep 1: Choosing the Right ImageThe first step to adding grass in Photoshop is to choose the right image. This means selecting a photo that has a clear view of the ground and preferably a flat surface. The grass will blend better on a flat surface compared to a bumpy one. Also, make sure that the photo has good lighting, as this will help in creating a more realistic look. A photo taken on a sunny day with natural light is ideal, but you can also adjust the lighting in Photoshop if needed.
Xem Them Tai: Master the Art of Adding Realistic Grass in Photoshop with These Simple Tips!
 Step 2: Creating a New LayerOnce you have selected the image, open it in Photoshop and create a new layer by clicking on the "Create a new layer" button at the bottom of the Layers panel. This layer will be where we will add the grass. Make sure to name the layer "Grass" to keep things organized.
Xem Them Tai: Mastering the Art of Adding Grass in Photoshop for Stunning Field Photos
 Step 3: Selecting the Brush ToolNext, we need to select the brush tool to paint the grass onto our image. You can access the brush tool by clicking on the brush icon in the left toolbar, or by pressing the "B" key on your keyboard. Once selected, adjust the size and hardness of the brush according to the size of your image and the type of grass you want to create. You can also adjust the opacity and flow of the brush to control the intensity of the grass strokes.
Tham Khao: Adding Realistic Grass in Photoshop: A Game Changer in the Photo and Video Editing IndustryStep 4: Choosing the Right ColorBefore we start painting, we need to select the right color for our grass. To create a more realistic look, it is essential to match the color of the existing grass in the photo. You can do this by using the eyedropper tool to select a color from the image, or by manually selecting a color from the color picker. It is a good idea to choose a slightly lighter shade of green to give the grass a natural highlight. Step 5: Painting the GrassNow comes the fun part - painting the grass onto our image. Start by painting small strokes of grass on the ground, following the direction of the existing grass in the photo. You can vary the size and intensity of the strokes to create a more natural look. It is important to remember that the grass in the foreground will be more detailed and defined compared to the grass in the background. Also, try to paint in layers, starting with a base layer and then gradually building up the grass by adding more strokes on top. Step 6: Adding TextureTo make the grass look more realistic, we need to add some texture to it. This can be achieved by using a texture brush or by adjusting the brush settings to create a textured look. You can also add some variation by using different shades of green or by adding some brown or yellow strokes to simulate dry or dead grass. Remember to vary the size and intensity of the strokes to create a more natural look. Step 7: Blending the GrassOnce you have painted the grass onto your image, you may notice that it looks too flat and does not blend well with the photo. To fix this, we need to blend the grass with the ground. To do this, we will use the Smudge tool. Select the Smudge tool from the left toolbar or by pressing "R" on your keyboard. Adjust the size and strength of the tool, and then gently smudge the edges of the grass strokes to blend them with the ground. This will create a more natural transition between the grass and the ground, making it look like the grass is growing out of the ground rather than being painted on top of it. Step 8: Adding Shadows and HighlightsTo give the grass a more three-dimensional look, we need to add some shadows and highlights. This will make the grass appear as if it is catching the light and casting shadows on the ground. To do this, create a new layer above the grass layer and name it "Shadows and Highlights." Then, using a soft brush, paint some shadows on the ground where the grass meets the ground. You can also add some highlights on top of the grass strokes to give them a more defined look. Remember to adjust the opacity and flow of the brush to create a subtle effect. Step 9: Adding DepthTo add even more depth to the grass, we can use the Dodge and Burn tools. These tools allow you to lighten or darken specific areas of the image, giving it a more three-dimensional look. Use the Burn tool to darken the areas of the grass that are in shadow, and use the Dodge tool to lighten the areas that are catching the light. This will create a more realistic look and make the grass appear more natural. Step 10: Making Final AdjustmentsOnce you are satisfied with the look of your grass, you can make any final adjustments to the image. This could include adjusting the lighting, saturation, or contrast of the photo to make the grass blend even better and give the image a more cohesive look. ConclusionAdding grass in Photoshop may seem like a daunting task, but with the right techniques, you can create a realistic and visually appealing field photo. Remember to choose the right image, use the brush tool and textures to create the grass, blend it with the ground using the Smudge tool, and add shadows and highlights to give it depth. With a little practice and experimentation, you can master the art of adding grass in Photoshop and take your field photos to the next level. Fotober is a leading provider of professional photo editing services, dedicated to delivering high-quality services to our customers worldwide. With a focus on fast and expertly edited images at an affordable price, our goal is to help our clients grow their businesses. We take pride in our commitment to providing top-notch editing services and strive to exceed our customers' expectations. At Fotober, we believe in the power of visual content and are dedicated to helping businesses stand out through our exceptional editing services.
#how_to_add_grass_in_photoshop, #howtoaddgrassinphotoshop, #Fotober, #Fotober, #Fotober
|